Showing posts with label terrain. Show all posts

29 February 2012

February Wrap-Up and Looking Ahead

Another successful month at the Bunker!  My stated goal for the year has been "one combat unit painted every week."  I exceeded the goal in January, and had no problem meeting it in February.  And I managed to finish a few new terrain projects, just to help move things along.

The completed list for February 2012:

  • Two more of my resin modular buildings painted to match my Rebel Minis Droptroopers.  

  • A junk-built communications transceiver for those buildings.
  • 72" of 3" wide hardboard road sections (6" and 12" lengths)
  • Two more Rebel Minis Titan HAMR suits.
  • Another unit of four Rebel Minis Droptroopers and a Wild CAT 'bot for my Christmas War campaign.
  • Three GZG Cyclops Battlesuits - repainted to match my Eureka Ventaurans.
  • Two Rebel VIPER Walkers.  A third was stripped and needs to be repainted.
  • A paint test figure of RAFM Planetary Militia.  
  • Six Critical Mass Games Kaamados Dominion Vivipara infantry.
  • One Critical Mass Games Kaamados Dominion Draco Aganath Imperator battlesuit.
  • And finally, three more Rebel Minis Earthforce HAMR suits.  My first mecha army is ready for some test games!


Here's my tentative painting agenda for March:
  • Proxie Models buildings.  I have about a dozen ready to be assembled, based, and drybrushed.  That will give me the ruined urban battlefield desired for my mecha games.
  • Paint two light walkers and one heavy walker for my GZG Crusties.
  • Paint another Ravenstar Silverback mech.
  • Start work on my next mecha-based army:
    • A unit of Micropanzer Russian Walkers
    • RAFM "Buckethead" Infantry with Micropanzer Remote Gun Drones
    • Brigade Models South African Wheeled MBT
    • Matchbox Armored Transports as APCs
  • Repaint my other three GZG Cyclops Battlesuits to match my Eureka Ventaurans.
And the high priority items on my shopping and wish list:
  • GZG Colonial Militia to support Blue Moon Orion Republic troopers for my Dominion Invasion game setting.
  • More Critical Mass Kaamados Vivipara and Draco Agonath suits (for the same setting)
  • ArtCrime Productions Assault Valkyries and Nationalist Infantry.  The Assault Valkyries will be for the Dominion Invasion setting, and the Nationalist Infantry are going to be multi-based to support the above Rebel HAMRs and Ravenstar Thunderfoot.
  • More Rebel Minis VIPER walkers and Drop Trooper Heavy Weapons (when released).
Cheers,
Chris

09 February 2012

Tutorial: Battlefield Wrecks from Die-Cast Toys

Here's a fun little terrain piece that I worked on between some actual painting projects.  I made a Cobra Hiss-inspired assault vehicle out of a few Hot Wheels late last year.  One of the toys I used was the Assault Crawler:


Specifically, I used the tracks and never touched the body.  I found that hollow body recently while working on another project, and inspiration hit me.  The body wouldn't look out of place on a hover or grav platform.  But instead of converting or sculpting something onto it, why not turn it into a wreck?

I sliced up the body with a Dremel tool and cutting wheel.  The die-cast steel is too thick to do any real damage, but a few quick slices around the driver's seat worked fine.  Then I mounted the wreck to a scrap of MDF hardboard, built up the edges with sand, and hit it with a black undercoat.  


I decided to use a pretty basic palette on this one.  I painted the base with medium gray craft paint and drybrushed Vallejo Heavy Grey (actually a green-grey) onto the body.  Then I drybrushed Vallejo gunmetal in a few "damaged" areas.


This looked like it belonged in a ruined city, or somewhere in a dark ash waste.  So I added my usual "gray gravel" blend to the base and hit the joints and Gunmetal areas with rust-colored weathering powder.


Project finished!  A fine bit of cover for infantry or a light walker, or possibly an objective to search for unclaimed ammunition or other parts that will be desperately needed in post-apocalyptic settings.  I'll have to keep my eyes open next time I'm looking at $1 die-casts... even if I can't use the complete vehicle, I could always use more of these wrecks for my ruined battlefields.

Cheers,
Chris

23 November 2011

A 15mm Urban Battlefield for Mecha Games?

There are half-finished Mecha sitting on my shelf, taunting me.

I have three Rebel Minis Titan HAMR suits, an Earthforce suit, and a Critical Mass Games ARC Fleet Walker, all waiting to be assembled and painted.  Other projects keep taking me away from them.  But I can't help but wonder how much fun a mecha-centric game would be in 15mm.  

I've gone back and forth on how many vehicles I want to use in my 15mm FUBAR games.  While I have a few Old Crow and GZG tanks finished, I've simply found them to be impractical on 2' x 2' tables.  There's enough room to maneuver just a one or two small vehicles, not enough to run fully mechanized platoons with MBT support on each side.  That's left me playing infantry-oriented games.  Such a waste - there are too many good 15mm vehicles to limit my options.

Mecha might be the answer for those smaller games.  They tend to move around the same speeds and maneuver the same way as infantry, but make louder and more satisfying explosions in sci-fi settings.  But what's the best terrain to give mecha some cover and concealment?  My desert and snow tables currently lack terrain features taller than 2".  Even my Red Planet table only has a few spires and buildings at that height.  And besides... when you picture a mecha battle, do you envision an open desert valley?  No.  You picture two armored giants fighting it out in a cityscape.

It's time for a new table.

This will be another 2' x 2' battlefield - which I still think is the perfect size for solo 15mm games.  I'm thinking this one will be covered with a mix of fine light gray, dark gray, and dark brown flock.  The buildings  will be mounted onto tiles - those tiles will use very fine flock to achieve a poured-concrete appearance.  And the buildings themselves?  I have my eyes on Proxie Models' Gothic Building:


If there's one aspect of Warhammer 40,000 I sometimes miss - it's the sight of a proper Cityfight table.  Ken's Gothic Building is about as close as we can get in 15mm (other than a few HO-scale churches that could be chopped up).  And the price is unbeatable - two sprues for $4.  I already have one of his brick buildings, so I know the quality is good and they can easily be chopped up and modified.  So if I include that brick building, here's what I can make with $32 worth of Gothic buildings:


So my shopping list for this project will be:

  • 2' x 2' x 1/2" sanded plywood for the table itself
  • 2' x 2' x 1/4" MDF hardboard for the building bases 
  • Extra fine grey flock for the building bases
  • Fine brown flock to mix with my existing grays for the table itself.
  • Cheap gray primer for the tabletop
  • 8x Proxie Models Gothic Buildings.
This entire set should only cost around $50-$60 to make, and could easily be finished in a week.  I can always go back and add fancier buildings, street furniture, and other random items later.  But this would be enough to start - and give me an excuse to add some bigger mecha to my collection:

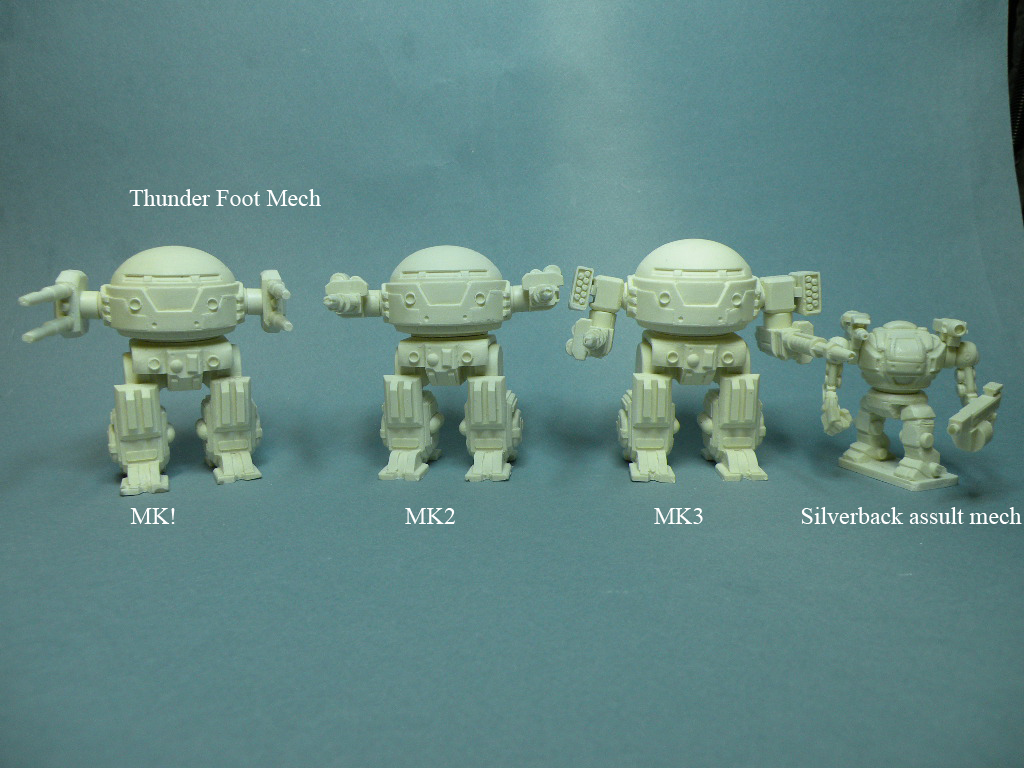
From Ravenstar Studios - love that MK3!
Gruntz Imperator
I think this is just the setup I'll need to run small 15mm mecha games... maybe three HAMR suits on one side, with one or two bigger Imperators or Thunderfoots (er, Thunderfeet?) on the other.  

Cheers,
Chris K.

03 November 2011

Could it be? An inexpensive source of 15mm buildings?

GameCraft Miniatures recently launched a range of laser-cut MDF buildings.  These are designed for 15mm modern warfare - other than a few large western ruins, this growing range consists of middle-eastern and central-Asian houses, schools, etc.  It doesn't appear to be anything that the historical/modern crowd hasn't seen before - except they are far cheaper, and the MDF is very easy to modify.  For the price of 2 or 3 JR Miniatures resin buildings, one could make an entire city from these GameCraft kits.

They reminded me of the CNC Scenery Australia stuff I bought back in my 40K days.  I had nothing but good experiences with those items, other than the time it took to cut and sand the building pieces.  GameCraft says they do all the cutting on these, so that would greatly cut down the build time.  My initial reaction to these was "hey, that's great for the modern gamers.  Now we'll just have to wait and see if they release any sci-fi buildings."  I thought this because, other than making old-school adobe Space Ork structures, I didn't see much use for these products.

Today's release of their Afghan-style hovels convinced me to take another look.  Here's a few shots of what they have (shamelessly stolen from their webstore):

Afghan Hovel - $3.50

Afghan Hovel - $4.50
Nice, simple block buildings.  Wouldn't these be perfect candidates for some GZG or The Scene building fixtures?  Or even some bits from the IMEX Hexagon or Platformer sets?  A few interesting hatches, windows, vents, and rooftop machines/sensors/radar dishes, and I might have perfectly usable sci-fi structures.  I think it would be pretty simple to create a full settlement - $50 worth of these and other bits should cover my usual 2x2 tables.  The results would be fairly permanent structures - great for a research station, military installation, or even buildings around a starport.  GZG Shanties or Battleworks Studios Startown Slums could be placed around the outskirts of these buildings, if I want a varied look.

But instead of trying a full settlement, maybe I should just start small.  The middle-eastern portion of this range also offers some interesting items.  What has really caught my eye is the Walled Compound models:
Walled Compound - $12.00

Adding a few bits to this would create a great little structure.  While this could obviously be used for my ex-The Scene Space Orks, it might be a good outpost for my Desert Raider skirmish force:


Or maybe a compound for my growing force of Cultists.


I see myself trying out a few of these items in the near future.  My question to you - what approaches have you seen in "futurizing" modern structures for gaming?  I'm always happy to steal others' ideas!

Cheers,
Chris

13 April 2011

Growing the collection: Terrain Edition

Since the pile of unpainted figures and vehicles seems to be growing much faster than I can paint, I decided to slow down on my miniature purchases for awhile.  Instead, I decided to focus on expanding my terrain collection.  For quite some time now I've been playing on vinyl tiles, using just a few painted-and-flocked styrofoam hills... maybe the occasional clump of Ground Zero Games shacks.  But the same old terrain was getting pretty old... definitely time for a change!

The GZG shacks are great little buildings (see Dropship Horizon's writeup)... lots of possible gaming scenarios in that type of environment.  I grabbed a second set of them before GZG went on hiatus.  In the midst of his packing and shipping chaos, Jon accidentally gave me a double batch of the side walls.  So now I have spare bits, possibly to make a walled compound (similar to the old Gorkamorka forts).

And a couple weeks ago, Battleworks Studios announced an second series of their own Startown Slums line.  The first series had been on my list to buy when the budget allowed, and the extra buildings were too good to pass up.  After selling some old Rogue Trader lots on TMP, I was able to buy both sets!  I'll post a detailed review when they arrive.

But what about the terrain itself?  My old styrofoam hills and floor tiles are okay, but I want some variety.  For some time I've had my eye on Zuzzy's Despoiled Reaches line.  Well, I took the plunge and ordered a 2'x2' mat, a large hill, some sulphur vents,  and some limestone spires.  If this stuff is half as easy as it looks to paint, I could easily see myself expanding it to a 4'x4' mat and some additional pieces.

There are still a few items I'd like to add eventually.  These are some of the bits I'm hoping to add to my collection over the next year or so:

  • A War-Zone GTS Bloodstone tabletop and some acute hill packs (to do a Mars-style board).  In theory I could make most of that stuff on my own, but War-Zone's stuff is cheap and good enough that I would rather spend my time painting miniatures.
  • A JR Terrain muddy river set.  I've seen these in person at a few shops, and again, they are far better than anything I could produce myself.
  • Some S6 Engineering city streets and canals.  I assume they will be a big hit with the Gruntz demo board at Salute this weekend... hopefully we'll see some good photos from those games.
  • Critical Mass Games also has a set of pyramid-styled alien buildings in the works.  I've been kicking around a sci-fantasy setting to game, and I could easily see these as being the rulers' fortresses. 
There's a lot of other good stuff out there (Old Crow has their urban buildings, and Combat Wombat just released this modular building) that I'll probably pick up in small doses when I get back to ordering minis.  

Cheap homemade terrain was nice while it lasted... but for someone without much spare time, I say bring on the good stuff!

Chris

08 October 2010

Snow Terrain - Step By Step

A quick read through my old pictures and battle reports, and anyone can see that I prefer desert and urban environments in my wargames. I decided it was time for a change! The fictional universe where I've been playing (most of) my 15mm games - the Conquest System - has around twenty planets and moons that were terraformed by the lowest bidder. As such, I've decided each world has a fairly harsh environment; most are too hot, some are too cold. Which means any struggle for resources in the Conquest System will involve some snow planets. I needed enough snow terrain to fight these battles upon.

I tried a few new techniques for my snow, building on skills I've learned doing grassy and desert hills over the years. Since these will be used predominately by 15mm miniatures, I went with 1/2" styrofoam as the basis. The pieces I used in this set were packing material from my toddler's play kitchen - low density, but exactly the thickness I wanted. And easily handled by my trusty old Wonder Cutter.
Then it was a matter of cutting them to the exact shape I need. My favorite commercially-made foam hills are the Acute Hill Pack from War-Zone terrain (3/4 of the way down this page) - well worth the money if you don't to take the time or deal with the mess of making your own. And War-Zone uses good blue insulation foam, so it's quite a bit more durable than the stuff I make. But since I only get four or five small games in a month, these should last a little while. For my initial snow terrain set (which will be a 2' x 2' skirmish board), I cut four acute hills (one with two levels), rough triangles with a bit of a waviness to the cuts.
Nothing pretty, but it works for a quick snow hill. Once the hill is cut it just needs to be painted and textured. I use very inexpensive Wal-Mart craft paints for most of my terrain. I covered the entire hill with (thinned) Folk Art Medium Gray, then painted the entire top with flat white. To add a little bit of depth to it, I drybrushed the "wavy' edges of the hills with the same white.
The next part was really where I had to learn a new technique. For green flocking and desert sand, all I had done at this step was paint 50/50 white glue/water over the top surface, use a dollar-store shaker to apply the texture material, shake away the excess, and seal it when dry. But the Woodland Scenics snow that I bought is far too light, and it floated right off of the mixture. So I ended up pre-mixing it into a paste - it was equal parts snow texture, white glue, and water. It had the consistency of a dry, sugary frosting, and was applied very roughly with an old brush.
I'm fairly pleased with the result. The brush gave the mix a bit of a deeper texture - the end result is very different from simply applying sand and painting it white. I think these will survive just long enough for me to see if I like playing games on snow terrain. If I like it when these start to crumble, I'll probably replace them with the War-Zone stuff (just as I did with my grasslands stuff a few years ago).

And now for the gaming surface itself. I've been playing my recent desert games on 12" x 12" vinyl floor tiles. I figured this should work pretty well for snow terrain. I bought four of these today. The next step will be to give them a very light spray of white paint, and then lightly apply some of the snow terrain. Some of the beige and gray texture should look good peeking through the snow, so I'm not going to go quite as heavy or thick as I did on the hills.
So it's almost ready. A little more work, and I'll have a 2' x 2' snow table with a small assortment of rocky hills. When I expand snow games to a larger table, this set will serve alongside the Critical Mass Games Otillium Refinery set (all of which will have snow bases). A table like that will do a great job repeating some of the fossil fuel battles fought in the Conquest System.

I hope to have a USE ME battle report on the finished mini-table very soon!

Chris

10 June 2010

Dual Post: Painted New Terrain and Titan Marines Review

Greetings all!

The molds for the 15mm buildings and barricades are coming along well, and I have the first batch of production-ready casts complete. I'm still hoping for a product release sometime before the end of June, but it may be pushed back to early July since I'm closing on a new home.

In any case, I did take the time to get one of the small modular buildings painted up for a demo, along with my first squad of Rebel Minis Titan Marines. Thanks again to Rebel Mike for letting me use his minis in my semi-promotional pics!


I've received a few questions about how difficult the resin terrain will be to paint. In the past, I've had some problems with other resin models, so I did want to investigate this myself. The answer? No problems at all! The models are just textured enough that they take primer without any issues, even with the mold release unwashed. What you're seeing above is:

  • Two light coats of Armory Black primer
  • A quick drybrush of Citadel Foundation Adeptus Battlegrey
  • Doors and roof tiles picked out in Citadel Foundation Mechrite Red
  • Windows and roof hatch in Citadel Boltgun Metal
  • A quick wash of Citadel Badab Black over the roof and doors.

The whole thing took 45 minutes to paint after the primer was dry, and I'm pleased with the results. I'll pick out a few more details on the control panels and get it onto a proper desert base this evening and post an update (the paper tiles in the pic came from Ebbles Miniatures).

Part II - Rebel Minis Titan Marines

I never did take the time to review these troops. Of all the 15mm sci-fi minis I've picked up over the last year, these are easily my favorites. The Titan Marines have the appearance of moderately armored, mid-tech elite troops (their nearest 40k analog would be inquisitorial stormtroopers with bolters). They have very little in the way of mold lines, very realistic "advancing" poses, highly detailed weapons, and are simple to paint to a tabletop standard. Their appearance can range anywhere from a sci-fi nazi force to a neo-samurai analog. In my own games, I will be using them as quick-strike troops for limited, precise missions. Their paint scheme is basically the same as the building:

  • Base on pennies
  • Undercoat with Armory Black
  • Drybrush with Adeptus Battlegrey
  • Weapon and facemask highlighted with Boltgun Metal
  • Armor and helmet picked out in Mechrite Red
  • Dip the base in some rough, gravelly sand

My first unit of eight was completed in about two hours. Since Rebel Mike hasn't released the support weapons or command models yet I decided to give one of the Marines a single silver shoulderpad.

The models are still a bit plain, and I would like to make them stand out a bit more in the future. I'm thinking some kind of sci-fi jagged camo pattern on the red armor (black and pale grey) would make for a good finish. If you want to see these figures completed by a real painter, I highly recommend Jeff Racel's galleries.

Chris

EVENING UPDATE: TWO MORE PICS

I grabbed two quick shots after basing the small building on a CD and dipping it in sand. One is another close up, and another depicts the building defended by Titan Marines. The attackers in this shot are Rebel Minis Scourge.


25 May 2010

15mm Terrain - Early Test Casts

Greetings all,

This week I've had a chance to attempt some test casts from the terrain rapid prototypes! I snapped a few pics alongside some undercoated Rebel Minis Titan Marines for scale (and because that's the army who will use these in my own games!)


These were simple one-part molds, so the bottom detail wasn't captured. The final production pieces will have two-part molds, so the bottoms of the buildings will be much cleaner. What amazed me is how much detail the silicone I used captured... I had no idea the texture from the 3d printing would cast so well! I am going to sand a couple of the test pieces down to smooth surfaces, leave a couple more with the texture, and see how they both look when they are painted. If the smooth version looks better, I will make sure the final production models are cast in that style.


The barricades, on the other hand, look terrible in this picture. But don't fear! Rather than the actual poured RTV molds, these were done with "quick putty" silicone. This is basically silly putty that dries semi-solid, which means it has quite a few air bubbles and "smoosh" joints in the finished product. The production molds for the barricades will be FAR better quality than these, and I will post those test pieces by this weekend as well.


These "quick putty" casts for the barricades are simply a way for me to see how they look en masse, and try to get an idea of how I want to package the starter sets.

Stay tuned for more updates!


Chris

28 April 2010

Announcing Basement Gaming Bunker 15mm Terrain

Photobucket

Greetings all,


This post has been delayed a few times for an assortment of reasons, but the time is ripe to reveal what has been occupying our time the last few months. Basement Gaming Bunker, as part of its switch from a dedicated 40k blog to 15mm gaming, is announcing a small line of resin sci-fi terrain! With no further excuses or delays, here is an overview of our Wave 1 releases.

We hope to get this word out through Dropship Horizon, Miniature Review, Tabletop Gaming News, and The Miniatures Page over the next few days. The main thing we need to know is what kind of interest there is for this sort of product so we have a rough idea of how many initial castings we need before we start shipping.

We're hoping for a release sometime in early June. To begin, we will probably set up a Google Checkout shop on this blog. As the line expands, we will explore options for a dedicated webstore, so this can remain a proper gaming blog rather than a business newsletter.

All feedback is appreciated. Good gaming, all!

Chris Knowles, Bunker Honcho

Theme

Wave 1 is a line of prefab military structures. The thought behind this is when a large force enters into a lengthy engagement, they will need some barebones headquarters, supply, maintenance, and barracks structures. These are centered around large armored panels which can be assembled right off the dropship and put into service. A set of this terrain would be great in any attacker/defender scenario, or for use as a centrally-contested objective in neutral territory.

These buildings were purposely left devoid of some fine detail and additional parts. As such, they would work extremely well with conversion parts from IMEX plastic kits, Ground Zero Games' building fittings, etc. More buildings will definitely follow - but how many will depend on sales of this first wave!

All buildings are shown with Rebel Minis' awesome Scourge for scale.

Sci-Fi Defensive Barricades

Photobucket

The Defensive Barricades are a set of chest-height walls deployed around critical structures. The straight walls will come in either packs of six or eight (still haven't decided), while the 90-degree and 45-degree corners will come in two-packs of each.

Small Modular Building

Photobucket

I actually based this first piece on something I scratchbuilt for Epic almost fifteen years ago, and this is what inspired me to create this terrain. It can serve as anything - an armory, command post, security checkpoint, communications building, industrial control center, ammo dump, portable restroom... just about anything that only requires a small amount of space. It has a double blast door on one long edge, and a single blast door on the opposite short edge. The removable roof is recessed enough to place troops on top of the building, where they can take cover behind the armored walls.

Photobucket

The small building will be available individually, or in two-packs for a modest discount.

Medium Modular Building

The centerpiece of the collection. I actually scaled this building to the Brigade Tactical Operation Center where I ran radio and computer networks in the Army a few years back. It could serve as a headquarters building, barracks, dining facility, or any military (or future civilian/industrial) structure that requires a bit more interior space.

Photobucket

Putting It Together!

We haven't worked out the specifics yet, but we will offer a few "combo packs" of buildings and walls together. One thing I know I want to offer is this set as an introductory special for the first month:


Photobucket

So stay tuned for official information about the release, along with our standard complement of miniature and gaming system reviews. All feedback is appreciated!

03 September 2009

Eight terrain pieces in one day

I don't have an Epic post for the day, as I was distracted by a new personal record. Today I assembled, primed, and painted eight pieces of terrain in one session. Obviously these were small and easy, but I think they were much-needed additions to my modular Cities of Death battlefield system.

Until today, I had been using a jigsaw to cut my MDF hardboard bases. Today I discovered a much simpler way using a mini-hobby saw and sanding sponge - it worked well enough that I may post it as a separate tutorial. Rather than using my own hardboard, all eight bases for today's projects were scrap and offcuts from the CNC Scenery Australia tiles. Some of the tiles, especially the straight roads, left pretty usable chunks of hardboard.

The project list for today:
  • Straight wall section from Cities of Death buildings
  • Stand of Games Workshop barrels
  • Two piles of city rubble (my usual mix of ground sprues and aquarium gravel)
  • Two Games Workshop tank traps
  • Two Games Workshop personnel barricades
The straight wall section had the most detail, and even it only took me 45 minutes to paint. Black basecoat, heavy blue drybrush on the walls and rubble, rusty steel on the skulls and chains (tin bitz basecoat, tin bitz/boltgun mix drybrush, boltgun light drybrush) and a Bleached Bone drybrush on the skeleton.

The barrel stand was basic rusty-steel, and the rubble piles were drybrushes of the usual Wal-Mart craft paints that I use on most terrain.


I'm getting far more comfortable with my rusted-metal effect. I'll have to get a better picture of it later, along with a tutorial.

15 August 2009

City Tile Update and the Next Step


Last weekend, my girlfriend and I applied tinted Minwax Acrylic stain to the pained CNC Miniature Scenery's Urban Grounds tiles. The results are exactly what I wanted - something darker than the manufacturer's suggested paint scheme, but still having more color levels than Games Workshop's own city tables.

There are still some finishing touches needed, such as metal paint on the sewer grates and manholes, along with gluing some rubble and bones into the blast craters. But they are now ready to be used for a game.

The next project is to assemble enough buildings for a Gamma-level fight. I don't need Omega-level buildings until the rest of the CNC tiles are painted and stained. This seems to be the best approach - I spent two days assembling the City Grounds and Urban Grounds kits, and was immediately overwhelmed with how many there were. Doing them in small chunks makes the project very manageable. So I'm going to try the same approach with my Imperial City boxed set - build just a few buildings at a time rather than using every sprue and bit in the box.

I also want to pick up one more item - a Shrine of the Aquila. Initially I was very unimpressed with this building - it was tall, thin, and lacked detail compared to the existing Cities of Death sets. And like most internet gamers, I immediately complained in the forums. I still think standalone, the kit is fairly unimpressive.

But I saw something this week on GW's site that has completely changed my opinion. It is the cover image for the Focus on 40K Terrain article:

http://www.games-workshop.com/gws/content/article.jsp?categoryId=cat1310001&aId=15700001

It uses the Shrine along with Basilica and Sanctum components to make a building that I can only describe as "solid awesome." I intend to build something almost identical to this and use it as the centerpiece in my City of Death.

03 August 2009

Miniature Scenery CNC Urban/Battle Ground tiles


A few months back, I ordered both the City Ground and Battle Ground series of modular tiles from CNC Miniature Scenery (Australia). I assembled and primed the tiles over the course of a few weeks, but abandoned them in favor of more work on my Executioners and Arbites. Assembly was very straightforward - took me three evenings to finish both packs, using nothing more than my hobby clippers, a sanding sponge, and some Elmer's glue.

My initial review of the tiles is extremely high - I am VERY impressed by their construction, assembly, instructions, and quality. I've assembled the tiles into many demo setups, and haven't had a problem yet with fit or finish. But, as I said, other projects took over, and the assembled-and-primed tiles sat in the basement for months.

The last few weeks, after my 2-year-old daughter's bedtime, I was able to get around to painting. I stay pretty cheap when it comes to terrain - all the paint is the cheap craft-store brand Folk Art, the brushes and mini-roller were from Dollar Tree, and the texture was some old Red Devil paint additive I had in the basement. Even with these cheap supplies, I was impressed at the overall results. My girlfriend Casey pitched in with some touch-up painting the past few nights, and here is a sample of our results.


In total I have 26 tiles painted. The tiles are a little over 9"x9" each, so 25 will make an Alpha- or Gamma-level Cityfight board. Ten are blank tiles for buildings/ruins, one is a decorative "courtyard" tile (I checkered it just for fun), and the rest are a variety of road sections. The final stage before play is going to be the application of Minwax acrylic stain, to properly "dull" their overall appearance (similar to the "dip" technique found on numerous other blogs). I'll post updated pics after the stain is applied.