22 December 2011

"You are two UGLY mother..."

I had all kinds of plans to start working on my Critical Mass Games Kaamados Dominion figures this week.  But, of course, I was one paint color short.  In the meantime, I decided it was a good time to paint my Khurasan Miniatures Vacation Aliens.   

"If it bleeds, we can kill it.
It only took a few hours to do both.  They definitely look better in the flesh... I tried a dozen camera settings and this was the best that came out.  The paint scheme:

  1. Vallejo Heavy Khaki on the exposed skin
  2. Secret Weapon Green-Black Wash over the Heavy Khaki
  3. P3 Cryx Bane Base over boots, straps, armor bits, weapons, and helmets.
  4. Vallejo Gunmetal drybrushed over most of the Cryx Bane.  I was only going to use this on the armor and helmet, but it ended up working okay on all of the straps and pouches.  I remember the medical kit in the first movie had some pretty crude elements to it.  I figured using metal strapping instead of fabric webs would be equally crude.
  5. Vallejo Blood Red on the eyes, and the targeting lens on the left mini.  
  6. Secret Weapon Armor Wash over the shoulder weapons (just to give them a slightly different tone).
  7. Wonder Wash Black over the entire mini.
Now I need to figure out exactly how to use these in my own settings.  I've never been a fan of replaying scenarios from movies or shows.  Instead, I think these will be some type of bounty hunting team, or possibly master-race enslavers for something like GZG Crusties.  

Cheers,
Chris

20 December 2011

Reinforcements for the Cult of the Crimson Robe

Sorry about the hiatus here, folks... sometimes I neglect this blog when I'm writing for Dropship Horizon.  :)  Still, I've managed to work on a few of my own forces.  I painted these 15mm.Co.Uk HOF Cultists back in October.


These were pretty much demo pieces when I painted them.  I wanted to see how they would look alongside this Kremlin Miniatures Commander Vortan figure.


I had originally painted Vortan to use in a 15mm Inquisitorial Retinue for In the Emperor's Name... this was a way to get some additional mileage out of the same figure.  Obviously the figures work great together, as the basis for some kind of fanatical cult force.  Also, 15mm.Co.Uk added some heavy weapon figures to their Cultists range.  There was no longer any doubt in my mind that this cult could become a full army.

I still had seven Cultists from my first pack.  I painted four more of them this week. Bear with me on the pictures - I'm trying out a new photo box and haven't worked out all the kinks.


These figures are nice and quick to paint.  I'll have to pick up another pack of the troopers, a pack of heavy weapons, and then I should be good to go for cult infantry.  But what about vehicles?  I don't have much left unused in my collection outside of a couple of Old Crow Gecko pickups and a Goanna transport.  The Gecko would be a great technical truck... I even have some GZG freestanding autocannons to mount in the back of the truck.


And the gunner?  Well, there's a reason I didn't paint those last three Cultist troopers.  Inspired by Matt's conversion article on Dropship Horizon, I'm going to try to turn a couple of these Cultist troopers into standing gunners.  It should be as simple as cutting and filing out the arms and gun, filing down the thick cast base on the figure, and making a couple of new arms out of grey stuff.  I don't have much experience with sculpting putty, and this looks like a very forgiving project to get my feet wet.  

On the other hand... is this the direction I want to take my cultists?  The end result would be pretty similar to the Desert Radicals that I've already been playing with.


And, because wealth seems to flow to people of questionable sanity, many of the fanatical cults we see in the real world have pretty substantial funding.  Maybe something along the lines of the Combat Wombat Pitbull, GZG Bulldog, or the Khurasan Atlas would better serve this cult.  Either way, I now have enough figures to run them in a small game of ItEN or Blasters & Bulkheads.  I'll figure out the vehicles after I finish some more infantry.

Cheers,
Chris

29 November 2011

15mm Urban Ruins - Proxie Models Test Building

After the last post, I decided to put together the one Proxie Models building I have right now, and worry about the rest of my Urban Table project later.  This is pretty much the same technique I used long ago with my GW Cities Of Death buildings.

Raw materials: one Proxie Models ruined building set, a 6" x 6" square of 1/8" MDF hardboard, and a length of styrene corner stock I found in a drawer.  The Proxie walls don't really have finished edges, so I thought the styrene would be a good option for building corners.  It also gives me a way to quickly change building styles with the Proxie sprues... I'll just use square corners on some, rounded corners on others.


I used an X-Acto hobby-sized miter box and saw to cut the corners and went to work.  Assembly was pretty simple - Tacky Glue held everything together and set quickly.  Gorilla Glue would have been another option.


Then I decided the building needed a floor of some kind.  I cut 1" x 1" squares from an old blister card.  I try to save small bits of packaging that are on really nice glossy stock - they come in handy.  I meant to go back and score these so there would be fore tiles per piece, but I got lazy.  I did cut a few tiles up by the most damaged portion of the building, just to give a broken effect:


And for the rubble - plain old sand that I liberated from a local park.  I piled it up along the foundation, with a few thicker piles over the damaged sections.  It's not a super realistic effect, especially if you go back and look at pictures of WWII Stalingrad and the like.  But realistic rubble would pretty much fill the building - not useful for maneuvering figures!  I think this is a good compromise between realistic rubble and plain ruins sticking out of the ground.


I think this is good enough for my test piece.  I might mix in some larger bits of rubble next time, but this will be a decent start for my war-torn cityscape.  I'll get it painted as soon as there's another day warm enough to spray primer onto it.

Cheers,
Chris

23 November 2011

A 15mm Urban Battlefield for Mecha Games?

There are half-finished Mecha sitting on my shelf, taunting me.

I have three Rebel Minis Titan HAMR suits, an Earthforce suit, and a Critical Mass Games ARC Fleet Walker, all waiting to be assembled and painted.  Other projects keep taking me away from them.  But I can't help but wonder how much fun a mecha-centric game would be in 15mm.  

I've gone back and forth on how many vehicles I want to use in my 15mm FUBAR games.  While I have a few Old Crow and GZG tanks finished, I've simply found them to be impractical on 2' x 2' tables.  There's enough room to maneuver just a one or two small vehicles, not enough to run fully mechanized platoons with MBT support on each side.  That's left me playing infantry-oriented games.  Such a waste - there are too many good 15mm vehicles to limit my options.

Mecha might be the answer for those smaller games.  They tend to move around the same speeds and maneuver the same way as infantry, but make louder and more satisfying explosions in sci-fi settings.  But what's the best terrain to give mecha some cover and concealment?  My desert and snow tables currently lack terrain features taller than 2".  Even my Red Planet table only has a few spires and buildings at that height.  And besides... when you picture a mecha battle, do you envision an open desert valley?  No.  You picture two armored giants fighting it out in a cityscape.

It's time for a new table.

This will be another 2' x 2' battlefield - which I still think is the perfect size for solo 15mm games.  I'm thinking this one will be covered with a mix of fine light gray, dark gray, and dark brown flock.  The buildings  will be mounted onto tiles - those tiles will use very fine flock to achieve a poured-concrete appearance.  And the buildings themselves?  I have my eyes on Proxie Models' Gothic Building:


If there's one aspect of Warhammer 40,000 I sometimes miss - it's the sight of a proper Cityfight table.  Ken's Gothic Building is about as close as we can get in 15mm (other than a few HO-scale churches that could be chopped up).  And the price is unbeatable - two sprues for $4.  I already have one of his brick buildings, so I know the quality is good and they can easily be chopped up and modified.  So if I include that brick building, here's what I can make with $32 worth of Gothic buildings:


So my shopping list for this project will be:

  • 2' x 2' x 1/2" sanded plywood for the table itself
  • 2' x 2' x 1/4" MDF hardboard for the building bases 
  • Extra fine grey flock for the building bases
  • Fine brown flock to mix with my existing grays for the table itself.
  • Cheap gray primer for the tabletop
  • 8x Proxie Models Gothic Buildings.
This entire set should only cost around $50-$60 to make, and could easily be finished in a week.  I can always go back and add fancier buildings, street furniture, and other random items later.  But this would be enough to start - and give me an excuse to add some bigger mecha to my collection:

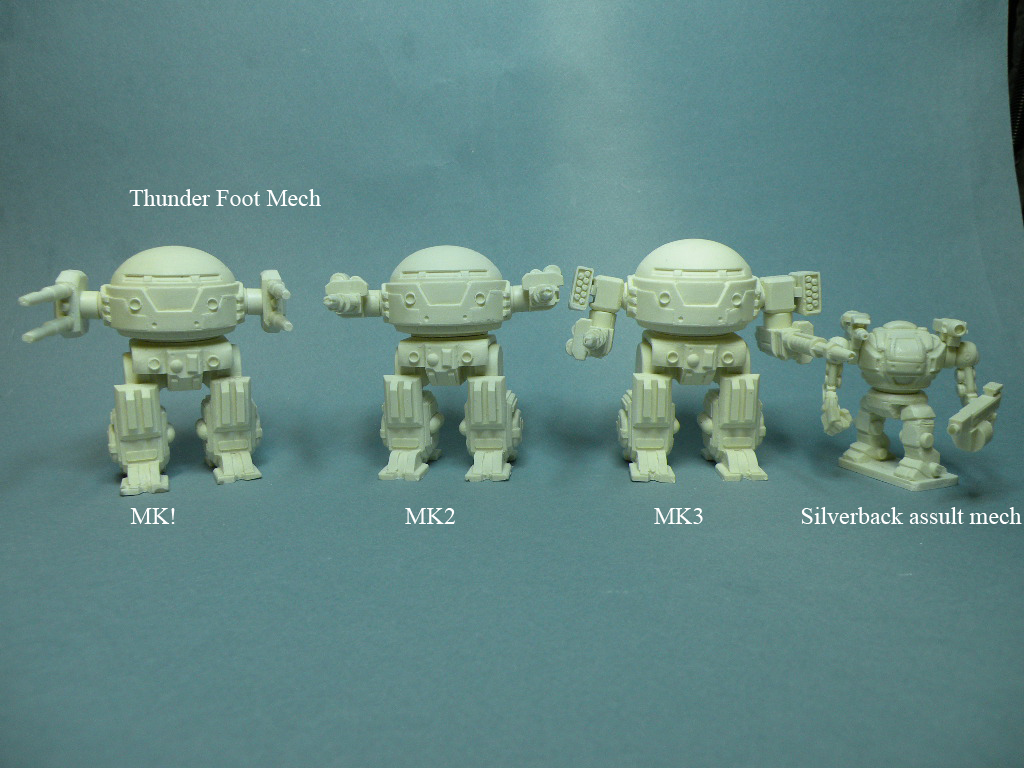
From Ravenstar Studios - love that MK3!
Gruntz Imperator
I think this is just the setup I'll need to run small 15mm mecha games... maybe three HAMR suits on one side, with one or two bigger Imperators or Thunderfoots (er, Thunderfeet?) on the other.  

Cheers,
Chris K.

16 November 2011

In The Emperor's Name - 15mm Enemies of Man retinue

This week has been all about finishing old projects.  First I completed that old Hot Wheels Sentry Tank conversion, and now I've finally finished painting my Enemies Of Man retinue for In the Emperor's Name.


I've been using these minis for months, ever since playtesting of ItEN began at the Forge of War development group.  But, unlike the rest of my collection, I had been using these unpainted.  Now that Blasters & Bulkheads is out, I decided it was time to finish them and use them the right way.


These minis are, of course, old Laserburn Redemptionists from 15mm.Co.Uk.  I think these sculpts have really stood the test of time - they have a great Space Opera feel to them.  And to all you 28mm gamers who think 15mm doesn't work for small skirmish - get back to me when your entire force costs £2.60 and can be painted in one evening. :) 

I'll admit the paint job isn't one of my best - all seven minis were finished in one setting.  But this isn't one of my primary gaming forces, so I was willing to sacrifice a precision to get them onto the table.  I used white Armory primer, Coat D'Arms Lupin Gray (long ago known as Citadel Space Wolves Gray) for the carapace armor, P3 Beaten Purple (looks lighter in person than in the photo) on the power armor and cloaks, Vallejo gold for detail work, and Vallejo heavy grey (actually a green-gray) for the weapons.  Then I gave the each mini a coat of Wonder Wash Black for some quick shading, finished the bases with my urban/asphalt blend, and called it a night. 


Here are the cards I've been using for ItEN (updated with the new photos).  I've tried everything from large roster sheets to tablet-screen reference pages now, and I've found that individual "playing cards" are what works best for me.


Now I feel like I can properly use these minis.  I'll run a few ItEN scenarios to give them a proper christening, then I'll start looking at how to use them in Blasters & Bulkheads.  


Cheers,
Chris